1. Introduction
Plant and Harvest Pro is an Expert Advisor designed to transform the trading process into a natural cycle of planting and harvesting. Inspired by the cycles of nature, this EA uses advanced trend and candle analysis algorithms to identify optimal moments to “plant” (open positions) and “harvest” (close with profits). The underlying strategy is adaptable to different trading styles and market conditions, making it a versatile tool for traders of all levels.
The objective of this guide is to provide a clear and detailed methodology for optimizing the parameters of Plant and Harvest Pro. Through optimization, traders can adjust the EA to maximize profitability, improve risk management, and adapt to changing market conditions. Throughout this guide, we will explore the key parameters that need to be adjusted, as well as the steps to follow to achieve an optimal configuration that aligns with your trading goals.
2. Optimization Parameters
-
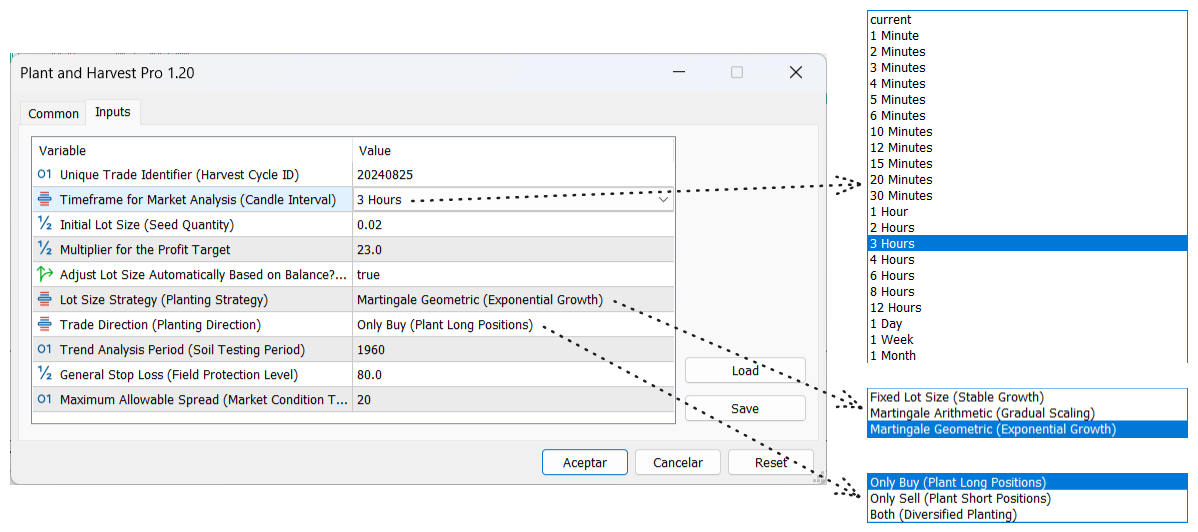
Unique Trade Identifier (Harvest Cycle ID)
- Description: This parameter sets a unique identifier for each trading cycle. This “Harvest ID” allows the EA to differentiate between multiple trades opened by various EAs. It is useful for avoiding conflicts between multiple instances of the EA operating on the same account.
- Recommendation: Keep a unique value for each EA if you are using multiple instances of the EA.
-
Timeframe for Market Analysis (Candle Interval)
- Description: Defines the timeframe used for market analysis. This refers to the candle timeframe that the EA will analyze to determine entries and exits. For example, “4 Hours” means the EA will analyze 4-hour candles.
- Recommendation: Adjust this parameter according to your strategy and trading style. Longer timeframes are generally more stable but less dynamic.
-
Initial Lot Size (Seed Quantity)
- Description: Determines the initial lot size for each trade. It is essential for setting the amount of risk assumed in each “seed” planted.
- Recommendation: Experiment with different sizes to find a balance between risk and reward, depending on your account size and the symbol you are trading.
-
Multiplier for the Profit Target
- Description: This parameter dynamically adjusts the profit target based on lot size. It refers to the multiplier applied to determine the expected “harvest” in each trade.
- Recommendation: Use this multiplier to scale your profit targets according to the risk you are willing to take.
-
Adjust Lot Size Automatically Based on Balance? (Growth Adjustment)
- Description: When enabled, this parameter allows the lot size to be automatically adjusted based on your account balance. This helps to adapt risk as the account grows or shrinks.
- Recommendation: Keep this option enabled to dynamically manage risk proportional to your account size.
-
Lot Size Strategy (Planting Strategy)
-
Trade Direction (Planting Direction)
-
Trend Analysis Period (Soil Testing Period)
- Description: Defines the number of periods used for trend analysis. This parameter controls how far back the EA looks to assess the current trend.
- Recommendation: Longer periods offer more stable trend analysis, while shorter periods are more reactive to recent market changes.
-
General Stop Loss (Field Protection Level)
- Description: Determines the general stop loss level for all trades. It is expressed as a percentage of the account balance and protects the account from significant losses.
- Recommendation: Adjust this parameter to protect your capital while allowing the EA to operate with enough flexibility.
-
Maximum Allowable Spread (Market Condition Threshold)
- Description: Sets the maximum allowable spread for the EA to open new trades. This ensures that trades are only executed under favorable market conditions.
- Recommendation: Set this value according to typical market conditions for the symbol you are trading, avoiding trading during times of high volatility or low liquidity.
3. Optimization Steps
Step 1: Open the Strategy Tester
To begin optimizing Plant and Harvest Pro, the first step is to open the strategy tester in MetaTrader 5. Follow these steps:
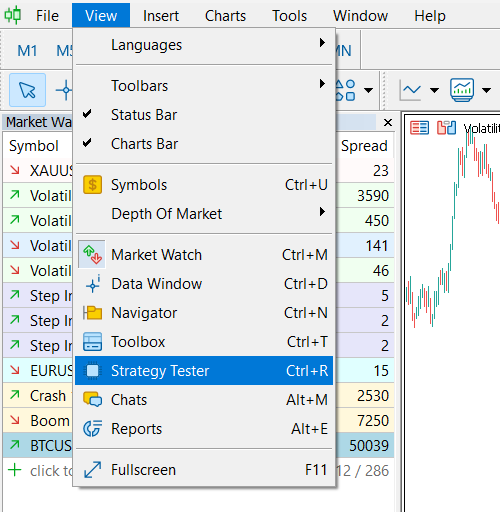
- Go to the top menu and select View.
- In the drop-down menu, select Strategy Tester or press Ctrl+R on your keyboard.
This will open the strategy tester panel at the bottom of the platform.
Step 2: Configure the “Settings” Tab
With the strategy tester open, follow the steps below to configure the optimization in the Settings tab:
-
Select the Settings Tab: Make sure you are in the Settings tab of the strategy tester.
-
Select the EA: In the Expert field, select Plant and Harvest Pro.
-
Select the Symbol: In the Symbol field, choose the asset you want to optimize. In this example, we will use the Volatility 75 Index.
-
Specify the Date Range:
- Date: Specify the date range for optimization. For this example, we will select data from the last year.
-
Select the Execution Model:
- Modelling: Choose 1 minute OHLC. This model is ideal for performing quick and accurate optimization.
-
Configure Deposit and Leverage:
- Deposit: Adjust the initial deposit amount according to your trading account.
- Leverage: Set the leverage based on your broker’s conditions and risk management strategy.
-
Select the Optimization Algorithm:
- Optimization: Select Fast genetic based algorithm for quick and efficient optimization.
-
Select the Optimization Criterion:
- Optimization Criterion: Choose the criterion you want to use for optimization. In this example, we selected Balance max to optimize the maximum balance reached during the test period.
Step 3: Configure the Inputs Tab
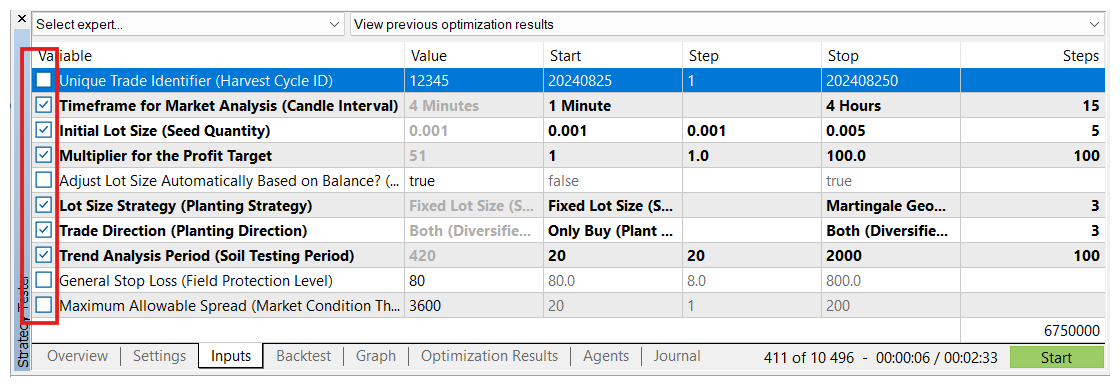
Once you have configured the Settings tab, it is time to define the parameters to be optimized in the Inputs tab. Here, you can select the specific parameters you want to include in the optimization and set the value ranges for each.
-
Access the Inputs Tab:
- Click on the Inputs tab in the strategy tester to view all the configurable parameters of the EA.
-
Configure Initial Lot Size:
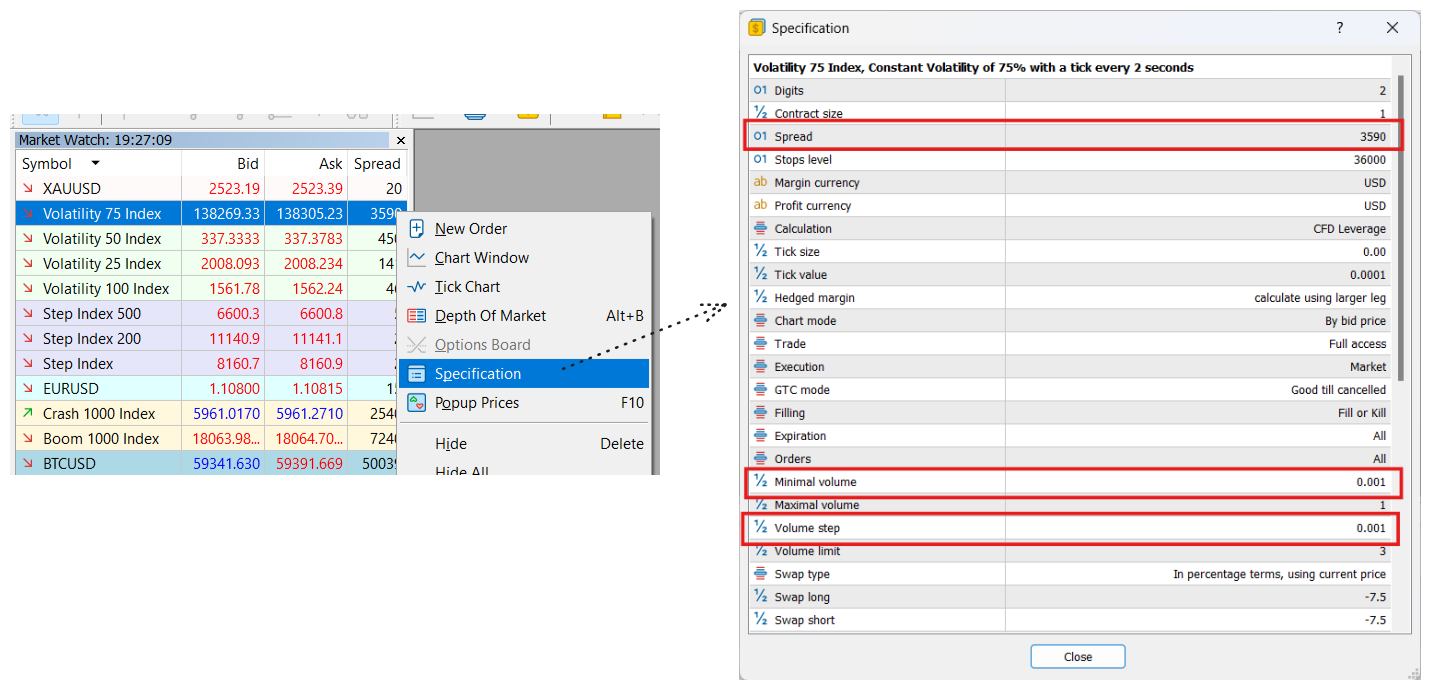
- Low Initial Capital: If your initial capital is low, there is no need to include the Initial Lot Size (Seed Quantity) parameter in the optimization. In this case, it is recommended to leave the value fixed at the minimum allowed for the symbol you are trading. This ensures that the EA operates with controlled risk from the start.
- Considerable Capital: If you have considerable initial capital, it would be advisable to include Initial Lot Size in the optimization. Be sure to set the step (increment) correctly according to the symbol’s specifications to avoid trading with inappropriate lot sizes.
-
General Stop Loss:
- It is recommended to leave the General Stop Loss (Field Protection Level) parameter at a fixed value and not include it in the optimization. This parameter defines what percentage of the account’s total balance you are willing to risk if trades go wrong.
- Example: If the balance is $1000 and General Stop Loss is set to 10 (representing 10% of the balance), the EA will close all open positions if losses reach $100. This protects your account from significant losses and allows the EA to seek new opportunities in the market.
-
Maximum Allowable Spread:
- Set the Maximum Allowable Spread (Market Condition Threshold) parameter slightly above the typical spread of the symbol you are trading. This ensures that the EA only trades when market conditions are favorable, avoiding situations where the spread becomes excessive due to high volatility or low liquidity.
-
Parameter Selection for Optimization:
- Check the boxes for the parameters you want to optimize. Set the initial values, range (start, step, stop), and make sure to include only those parameters that are critical to your strategy.
Step 4: Analyze the Results in the “Optimization Results” Tab
Once you have configured the Inputs tab and selected the parameters you want to optimize, it is time to start the optimization process.
-
Start the Optimization:
- Press the green Start button in the bottom right corner of the strategy tester. This will start the optimization process, where MetaTrader 5 will begin testing different combinations of the selected parameters.
-
Real-Time Visualization:
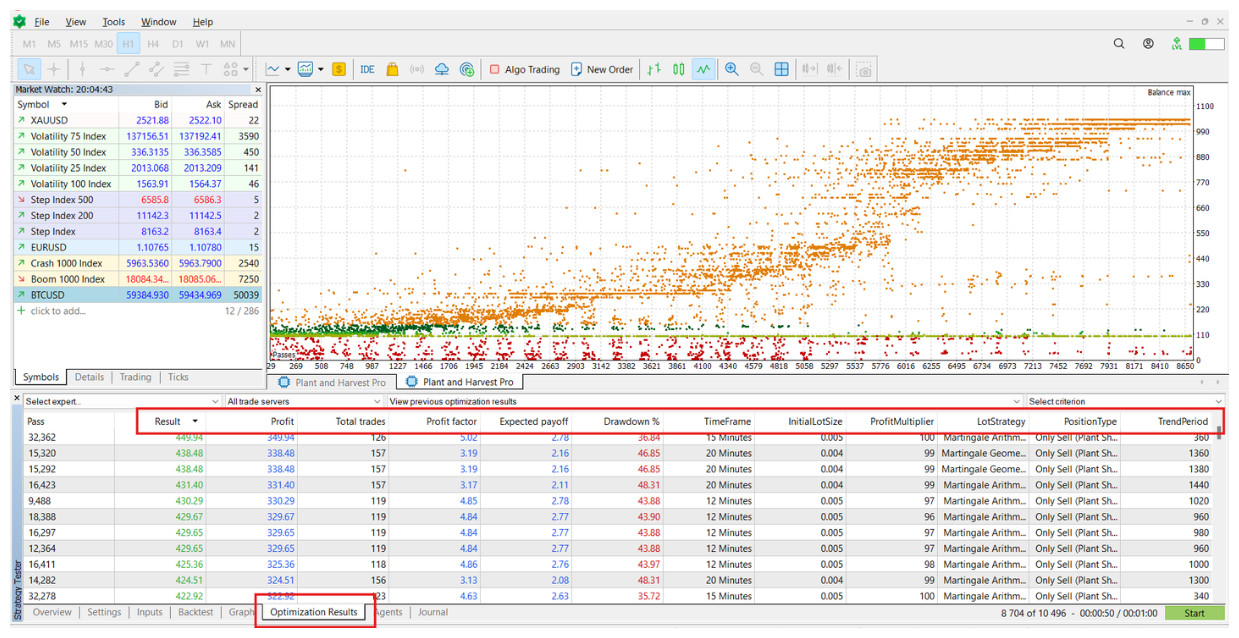
- As the optimization progresses, a scatter plot will open, showing the results of each parameter combination according to the optimization criterion selected in the Settings tab (e.g., Balance max).
- The scatter plot allows you to quickly visualize which combinations are yielding better results and which are not.
-
Review Results in the “Optimization Results” Tab:
- While the optimization process is running, you can review partial results in the Optimization Results tab. This tab displays a table with details such as profit factor, drawdown, total number of trades, and other critical parameters.
- The table allows you to quickly compare the different configurations tested, sorting them by the criterion you prefer.
-
Completion of the Optimization Process:
- Once the optimization is complete, the Optimization Results tab will display the full list of all parameter combinations tested, sorted by the selected optimization criterion (e.g., maximum balance).
- You will see the best result at the top of the list, allowing you to quickly identify the most promising configuration.
-
Load a Specific Configuration:
- After the optimization process is complete, you can double-click on one of the solutions listed in the Optimization Results tab. This will automatically load that specific configuration into the Inputs tab.
- Once the configuration is loaded, MetaTrader 5 will perform a balance simulation using the selected parameters, and the results will be displayed in the Graph tab. This allows you to visualize how the account balance would have evolved with that particular configuration.
This step is crucial for analyzing and selecting the best configuration based on the results obtained, ensuring that the EA is optimized for the selected symbol and your trading account conditions.
Step 5: Select and Save the Selected Set File
Once you have identified a promising configuration in the Optimization Results tab, the next step is to load that configuration and save it as a set file for future testing or live trading.
-
Load the Selected Configuration:
- Double-click on one of the solutions listed in the Optimization Results tab. Doing so will automatically load the selected configuration into the Inputs tab.
- You will see that all optimized values have been applied to the corresponding parameters, ready to be used in a simulation or live trading.
-
Configuration Verification:
- Review the loaded parameters in the Inputs tab to ensure that the selected configuration aligns with your strategy and trading expectations.
- If this configuration matches your objectives and market conditions, it is advisable to save it to have a set file ready for future use.
-
Simulation in Visual Mode:
- If you want to visualize how the account would have performed with the selected parameters, you can run a simulation in visual mode.
- To do this, go to the Settings tab and select the Visual mode with the display of charts, indicators, and trades option. This will allow you to see graphically how the EA would have operated with those parameters, including entries, exits, and the impact on the account balance.
-
Save the Set File:
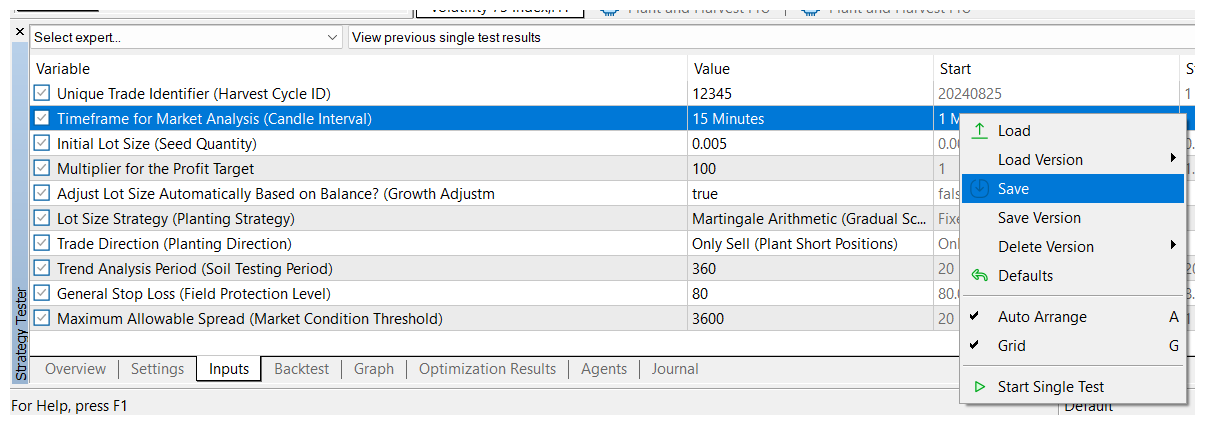
- Right-click anywhere in the parameter list in the Inputs tab and select Save from the context menu.
- Save the set file with a descriptive name that allows you to identify it easily later. This may include details such as the symbol, timeframe, and optimization date.
Saving the set file allows you to reuse this optimized configuration in future tests or when trading live, ensuring that you always have access to a configuration that has proven to be effective.
4. Activate the EA and Load the Set File in MetaTrader 5
Once you have completed the optimization process and saved your set file, you can proceed to use the Plant and Harvest Pro EA in the live market. Follow these steps to load the set file and activate the EA:
-
Open the Symbol Chart:
- Open the chart of the symbol you want to trade using the optimized set file.
-
Activate the EA on the Chart:
- Drag and drop Plant and Harvest Pro from the Navigator window onto the selected symbol chart.
-
Load the Set File:
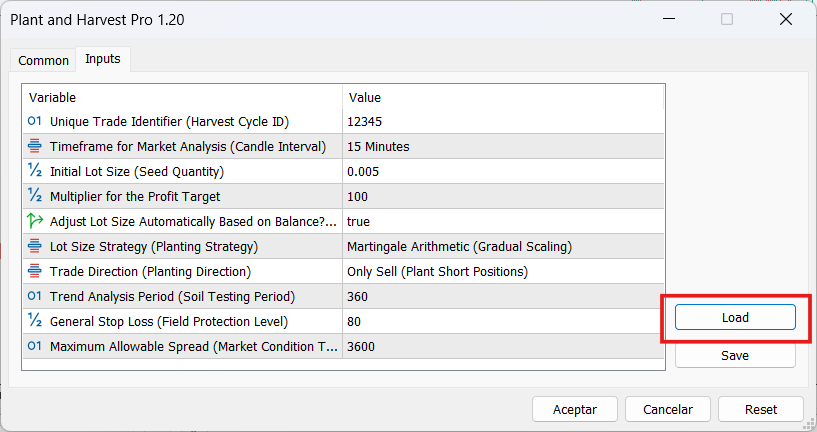
- In the EA’s Inputs tab, click the Load button.
- Select the set file you previously saved and load it. This will automatically apply the optimized parameters to the EA instance you are activating.
Risk Warning
It is important to remember that trading is a high-risk business. The market is unpredictable, and while optimization helps identify patterns in price that have repeated in the past, there is no guarantee that these patterns will continue to occur in the future.
During the optimization process, the goal is to find patterns in price behavior, and once identified, to take advantage of their future occurrence to try to make a profit. However, this does not guarantee that the identified patterns will repeat in the same way in the future.
For this reason, it is crucial to trade cautiously and only with money you are willing to lose. No trading strategy, no matter how optimized, can completely eliminate risk.
I hope this guide helps you optimize and trade with Plant and Harvest Pro effectively. Remember always to act cautiously and manage risk appropriately in all your trades.
Links
Plant and Harvest Pro: https://www.mql5.com/en/market/product/122186
All my expert advisors: https://www.mql5.com/en/users/simondelvecchio/seller
Telegram channel: https://t.me/+geAsOlnUtsZmMzQx

